With the assets you have seen so far you can add some nice images and sounds to the game asset browser, but they don't do anything in the game itself yet! For that we need the most important assets of all in GameMaker, the Object asset.
Objects are a special asset that we use to control aspects of a game and to do specific things. Most of the time they have a sprite associated with them so that you can see them in the game rooms, but sometimes they are used as a "behind the scenes" controller objects to do things like track stats, or set timings for cut-scenes, etc...
Objects can be given behaviours and they can react to certain events as well as to each other, and most of the things you see in a game are based on objects and their interactions with the user and each other.
Now, we can't talk about Objects without talking about Instances.
In a game made with GameMaker, the characters, monsters, balls, walls, etc... that you see in the game are actually all considered as being instances. An instance is essentially a "copy" of an object that is found in the Asset Browser and then placed in a room (think of objects as templates for instances).
So when we talk about something affecting or changing an instance, we mean that one particular copy of an object in a room is being affected while all the rest are not, but when we talk about affecting or changing an object we mean that anything we do to it will be reflected in all the instances created from that point on too. So, the object is the template for the instance, and the instance is what we place in a room to make our game.
To create a new object asset, it's the same as for every other asset and you simply right click ![]() on the Objects asset folder and select Create (or right click anywhere in the Asset Browser and select Create Object).
on the Objects asset folder and select Create (or right click anywhere in the Asset Browser and select Create Object).
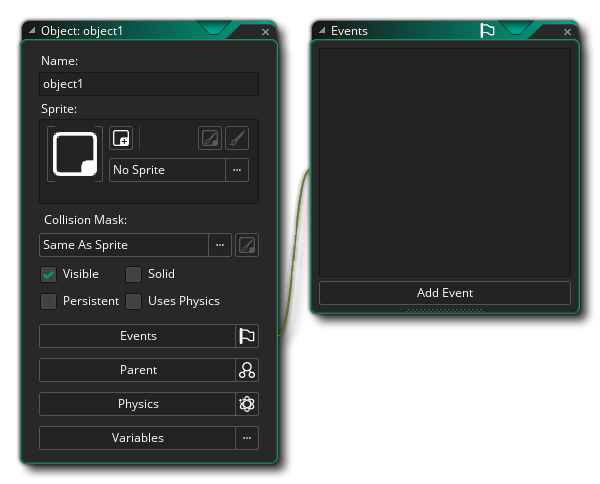
This is the Object Editor window and shows the current object properties, and the first thing you should do is name the object, again using a prefix like "obj_" or some other identifier. In general, for an object to draw anything and register collisions with instances of other objects it needs to have a sprite assigned to it, which is added using the ![]() button.
button.
This will open the Asset Explorer where you can select the sprite to use (you can also drag sprites from the Asset Browser and drop them onto the Object Editor to assign them):
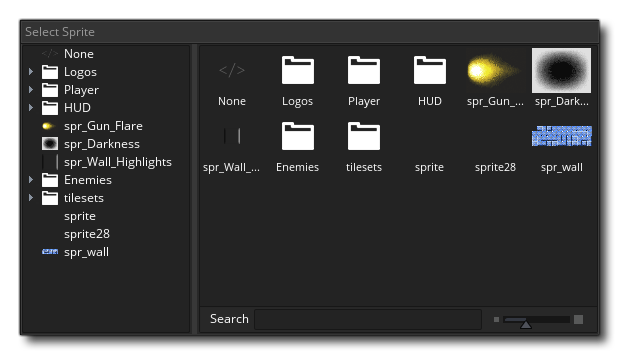
If you do not have an appropriate sprite yet, you can click ![]() on the New Sprite button
on the New Sprite button ![]() to create a new sprite asset and edit it as you wish, just as if you had created the asset through the standard sprite create options, only now it will automatically be assigned to the object that you had open when you started to create it.
to create a new sprite asset and edit it as you wish, just as if you had created the asset through the standard sprite create options, only now it will automatically be assigned to the object that you had open when you started to create it.
Once you select a sprite you can also click ![]() on the Edit Sprite
on the Edit Sprite ![]() or Edit Image
or Edit Image ![]() buttons to edit either the images of the sprite itself or the sprite asset. This can be faster than first finding the sprite in the Asset Browser and then indicating you want to edit it.
buttons to edit either the images of the sprite itself or the sprite asset. This can be faster than first finding the sprite in the Asset Browser and then indicating you want to edit it.
Once you have added or created the sprite, you can change a few other object properties like whether it should be visible or not - for example - or what kind of collision mask it should have. For simple games you probably don't need to change anything here and can now go on to add Events to the object.
Events are moments in the game where things happen - and you decide what happens at each moment, using events. This is how you program your game!
GameMaker works with cycles of these events - from the moment a room is started to the moment it is finished, there is a game loop running where every frame a series of events are run, and you can choose to place GML code or GML Visual actions in your instances that respond to these events.
To add an event you click ![]() on the Add Event button:
on the Add Event button:
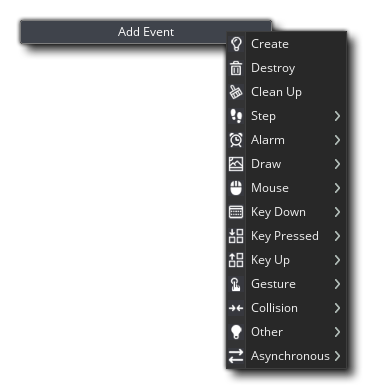
Above you can see all the different Event Categories, some of which contain other sub-categories. We won't go through all the events here, but we will cover a few important ones briefly:
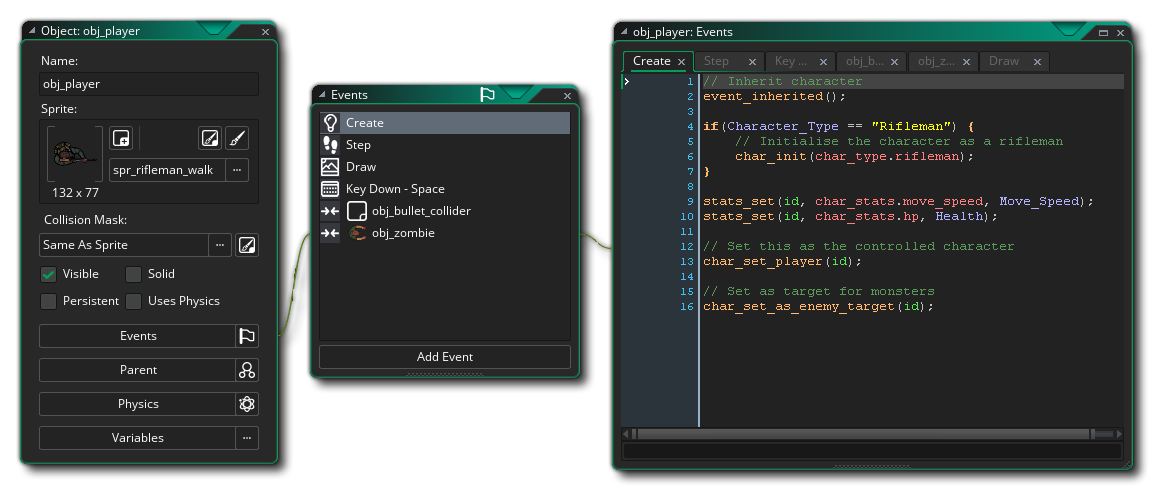
| Create Event | This event happens when an instance of the object is first created, and is the very first thing that happens within an instance that has been placed in the room through the room editor when a room is entered. This means that this event is the ideal place to initialise variables, set paths etc... and do anything else that generally only needs to be done once or only when an instance first appears in the room. | |
| Step Event | GameMaker splits game time into steps with the game speed defining how many of these steps there are supposed to be per second - by default, there are 60 steps a second. The Step Event is executed every single step of the game while the instance exists, and can be used for continuous behaviour like moving, collision checking, etc. Note that the Step Event category has three sub-categories to "fine tune" timing within the instance, but in general you will use the main Step Event most. | |
| Collision Event | Obviously when making a game, it is very important that you know when two (or more) instances of an object have collided, and for that we have the collision event. This is an event that you place in an object and then specify against which other object you should be checking for collisions, for example, the player colliding with a coin to collect it, or with an enemy to be hurt. Once you have added the event and chosen the object to check for, you can add GML code or GML Visual actions to program what happens on collision. | |
| Draw Event | There are multiple different Draw Events within the draw event category, but the one you use most is the one at the top simply called "Draw". This general draw event will be called, like the step event, every game frame, but it works in two different ways. The first is when you don't add this event to the object: When there is no specified Draw Event, then GameMaker will draw the sprite assigned to the object, using any transforms that have been applied elsewhere in the object (like to change its size or alpha blending), so even when no Draw Event is listed in the Events list, it is still being run and will still draw to the screen when an instance is placed in a room. The second way it works is when you add the event itself and include any GML code or GML Visual in it. Adding something to the event tells GameMaker "I want to control what you draw for instances of this object" and it completely overrides the default draw. This means that you can have an object with a sprite assigned, then set the draw event to draw text and the sprite will not be drawn as you have not told GameMaker to draw it (unless you do draw it), although the text will be. | |
| Destroy Event | This event is the very last event to be executed when an instance is destroyed. It is often overlooked when adding behaviours to objects, but it can be very useful - for example, for creating explosion or particle effects when an enemy is killed, or for re-spawning a new instance of the object in another part of the room, or even for adding points onto a score. | |
| Alarm events | An alarm event can be set using the alarm variable or the Set Alarm Countdown action. You can "set" an alarm to a number of frames (i.e. steps) and that alarm event will be executed after that many steps, from the time it is set. For example, in the Create event, you can set Alarm 0 to 100, and the Alarm 0 event will execute 100 frames after the Create event. | |
| Key Down Key Pressed Key Up |
These events run when input is found on the selected key. For example, let's take the "Space" event, which runs for the Spacebar. A "Key Down" event would execute every step that the Spacebar is held down. A "Key Pressed" event would only run that one step where the key was found to be hit, and will not run again until it is released and hit again. A "Key Up" event will run on the step where the key is released. |
For information on all other types of events, please see here.
You can then click on an event in the list to add it to the object.
At this point, you may be asked to choose between GML Visual and GML Code. See GameMaker Language for more information.
Adding an event will open either the GML Code or GML Visual editor, depending what type of event you are creating. In this window you can now add the code or actions that you wish to be performed each time that event is triggered within the game loop.
You can find more information about using GML in your object events from the two pages given below:
And you can find a full explanation of all the different parts of the Object Editor here:
The next part of this guide will look at one more resource type, Sequences...